When you think of makeup contouring, what comes to mind?
A slimmer nose, snatched jawlines, and sculpted cheekbones?
If you pictured any of these then you already have an idea what contouring is all about.
Contour makeup was at some point a trendy hot topic, everyone wanted to achieve a fake nose job and mimic that chiseled model appearance without having to do a nose job or put in fillers and Botox.
Back then contour makeup was reserved for runway models and high-end celebrity photoshoots.
And it was all about creating extremely sculpted looks aimed at transforming the face to look a certain way.
But over the years the trend has evolved to see people embrace a more natural contour pattern that enhances the natural bone structures and facial features.
If you've ever wondered how to go about applying your contour in the most natural way possible to suit your face shape, then this step by step guide is for you.
Here's what you'll learn:
What Is Contour Makeup?
Contour vs. Bronzer: What's The Difference?
Things You'll Need To Contour
How To Contour Like A Pro
What Is Contour Makeup?
Contour makeup is a transformative beauty technique designed to sculpt, define, and add depth to the facial structure. Unlike the everyday use of foundation and concealer, which aim to match the skin tone precisely, contouring leverages makeup shades that are two to three times darker or lighter than your natural skin color. This strategic application creates the illusion of shadow and light, emphasizing certain facial features while receding others, resulting in a more defined and visually appealing facial contour.
Difference Between Contour and Bronzer
Shuffling your way around contour and bronzer can be a bit confusing, especially as a beginner.
It doesn't help much that both products share similar qualities and they are applied on the same parts of the face like on the temples, sides of the face, nose and so on which is why most people tend to confuse one for the other.
First off, they serve different purposes. While contour is meant to add shadows and depth to the face, a bronzer is meant to warm up your complexion by bouncing off the light to give that sun-kissed or tan look.
That being said, most bronzing creams have a shimmery finish to it when blended but contour products are always matte.
Contour shades tend to have a neutral or grey undertone which is why it's perfect for shadowing the face, while bronzers usually come in warm red, yellow, and orange undertones.
Although some persons make use of bronzers in place of contour, it is not advisable as it may ruin the result of your makeup.
Using too much bronzer to contour will leave your face looking extremely warm or orange. Trust me, you don't want that.
What you should do instead is, apply a liquid or cream contour first, then go in with a powder bronzer to warm up your complexion, and remember to use a light hand and blend thoroughly.
Contouring Products You Will Need To Contour
There's no special tool needed for this. You probably have all you need already in your makeup kit so don't worry about having to buy new stuff.
You'll need all your makeup tools that you'll normally make use of, but most importantly these are the things you must have if you want a flawless contoured face.
1: A Contour Product:Contour products are available in cream products, liquid, and powder forms. So you'll have to choose the one you prefer. But as a beginner, it can be hard to decide which one works best for you when you haven't tried any.
To decide, you'll need to consider your skin type. Cream contour is great for people with dry skin types while powder is a better option if you have oily skin types. Whichever decide to use, go for one that's two or three shades darker than your skin tone, and make sure the undertone matches your natural skin tone too.
If you have a warm undertone, go for a red-brown shade, and a greyish-brown shade for a cooler undertone.
That being said, if you have oily skin but still want a liquid base of contour, you can also make use of your liquid foundation that's three shades darker to contour then set it with your powder contour for a more defined and longer-lasting contour and matte finish.
2: A Contour Brush:A contour brush is a must-have, especially for blending out powder contour. Your contour brush should have a flat or slightly angled surface with dense bristles for that seamless blend. You'll also need a smaller version for blending other harder-to-reach areas like the sides of the nose.
3: Makeup Sponge:You'll need this for blending out your cream and liquid contour. It will help soften the look and create natural-looking shadows. Ensure to dampen it before use.
4: Foundation:Contouring doesn't work on its own. You'll have to lay down a base with your foundation. Make sure your foundation matches your exact shade and undertone perfectly.
5: Concealer:As we mentioned earlier, contour and highlight are used together to create that sculpted look. While you want to add shadows with contour, you also want to balance it out by brightening or highlighting other parts of your face with concealer, especially the under eye, and T-zone. Plus it's also great for covering up blemishes or dark circles. A concealer that's two shades lighter than your skin tone will do the trick.
6: Blush:Blush brush is optional, but is great for bringing back color to the face.
7: Setting Powder/Setting Spray:If you're using all cream or liquid products, then you'll need to set your face lightly with a setting powder to keep everything in place so it doesn't slide off during the day. For powder contour, finishing up with a setting spray is essential to melt it in place so you don't end up looking cakey.
Step Tutorial: How To Contour Like A Professional Makeup Artist in Simple Steps
Watch the Youtube video or simply follow our step by step tutorial to learn makeup contouring
Step 1: Skin Prep
Every makeup routine starts with good skin prep. If you want your makeup to look like skin, then don't skip these basic steps. Your skin prep should include, cleansing your face with a gentle cleaner to remove all impurities, moisturizer, and sunscreen. You can add a toner or serums if you like but these three are a must.
Step 2: Apply your base products
Your base makeup products include your primer and foundation. A primer will act as a barrier between your skin and the many layers of makeup and also ensure it applies more smoothly and lasts longer. Start by applying a pea-sized amount of primer to your T zone, you don't need to apply it all over your face. Then go in with your exact shade of foundation and blend out with a foundation brush or a damp makeup sponge all over your face.
Step 3: Highlight with concealer
Using a concealer that's two shades lighter, highlight the under eyes, and T-zone- this includes the forehead, nose, chin, and the area above your cupid's bow. Wait for a minute for the concealer to get tacky then blend out.
Step 4: Contour
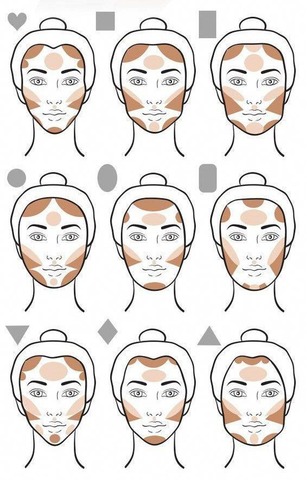
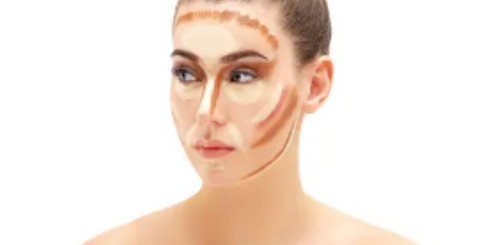
You're done highlighting, now it's time to contour. There are generally four common places you can contour depending on your face shape. The temples (along the hairline or side of the forehead), sides of the nose, cheekbones, brow bone, and jawline.
To contour your forehead: Apply your cream or powder contour along the sides, and blend upwards into your hairline. Depending on how wide your forehead is, you can also blend inwards toward the center to create the illusion of a smaller forehead.
Nose Contour: Apply the contour product with a small angled brush along the sides of the nose. For that slimming effect, your lines should narrow and not be far apart, blend it with a small blending brush into your eyebrows, making sure there are no harsh lines.
For your cheekbone: You'll have to identify where it is. Your cheekbone is just below the apples of your cheeks, so start by sucking in your cheeks, then apply your contour along the dent. Another way is to swipe your contour from the center of your ear and drag it down towards your cheeks. Then blend upwards towards the apples of the cheeks for a more lifted look.
To sculpt your jawline: Simply trace your contour product along both sides of your jaw stopping just before your chin. Then blend downwards into your neck to create that shadow of a slimmer face. This particular contour technique is great for reducing the appearance of a double chin.
Step 5: Add Blush
While this step isn't compulsory, it can enhance your overall look. Using a fluffy brush, apply a matte or shimmery blush in a circular motion on the apples of the cheeks, blending it upwards towards the sides of the face. This will act as a bridge between the highlighted and contoured parts of your face.
Step 6: Blend Everything
The key to a natural-looking contour is to blend properly. Use a large powder brush and blend the lines where your contour meets your foundation and highlight till everything looks like their fading into each other.
Step 7: Set Your Face
To set your cream and liquid contour, gently dust a setting powder all over your face, or apply a generous amount of setting spray for a flawless finish if you use a powder contour. Then go ahead and finish up the rest of your makeup.
Conclusion
Learning how to contour your face requires patience and practice and one way to step up your makeup game is to master face contouring.
Over the years, celebrity makeup artists have used this technique to enhance celebrity looks and thanks to them, almost everyone can now try it.
Here's one last tip, Irrespective of your skin type, you should try starting with a powder contour. They're buildable and easier to blend, so you'll make fewer mistakes.
Once you start getting a hang of how contouring works, you can switch it up for a liquid or cream contour.
Looking to style your home with something practical and stunning? Vanity mirrors are more than just a beauty tool—the...
Liquid error (snippets/pagination line 19): Array 'article.comments' is not paginateable.
Leave a comment
Comments will be approved before showing up.
Liquid error (sections/article-template line 192): Invalid form type "36\n", must be one of ["product", "storefront_password", "contact", "customer_login", "create_customer", "recover_customer_password", "reset_customer_password", "guest_login", "currency", "activate_customer_password", "customer_address", "new_comment", "customer", "localization", "cart"]


 Angelina Full Length Arch Hollywood Mirror 160 x 60cm
 Angled Luna Mirror-Cheval Black
 Angled Luna Mirror-Cheval Silver
 Anne Round Hollywood Mirror Gold 60x67CM